How to fit a paving drainage system
Patios, paths and drives are built with a slight slope (or 'fall') that lets any surface water drain away. But sometimes, it might not be enough simply to let the water drain onto a lawn or planted bed (particularly if you have a large paved surface or live in an area with heavy clay soil). In these cases you may well need to build a drainage channel to collect the surface water, and direct it to a dispersal point which leads to an existing surface water drain or into a soakaway.
Is your patio draining badly? Or are you laying a new patio or drive? An easy way to create a drainage channel along its edge is by moulding a concrete strip using a length of plastic guttering.


Top tip - Drainage in the middle of a patio
You can fit a drainage channel in the centre of a paved area. The paving either side should slope towards the channel edges, and the channel should have a fall of 1 in 80.


Step 1
Put a length of timber the required distance from the paved surface (in this case, slightly wider than the guttering used to mould the channel). Then hammer in wooden pegs at intervals and nail them to the timber. The channel should run at right-angles to the fall of the paving. Use a one metre-long straightedge and a 12.5mm shim to set a fall of 1 in 80 along the drainage channel.


Step 2
Next, mix some concrete using four parts mixed aggregate to one part cement. Then fill the channel with the concrete to a level slightly lower than the edge of the timber, and smooth it with a float.


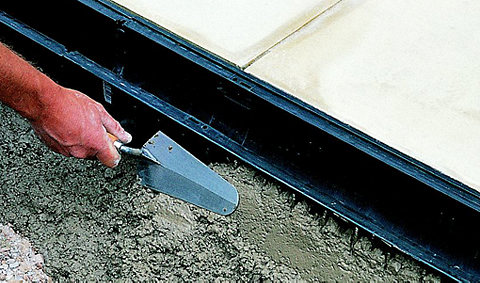
Step 3
Press the guttering into the wet concrete to leave a clear imprint. After this, remove the guttering and smooth any ridges in the concrete. Use a spirit level to make sure the fall is set at the correct angle.
Instead of moulding a channel in concrete, you can buy a ready-made drainage channel. This could be plastic, resin-bonded or vitrified clay.


Step 1
Run your channel at right-angles to the fall of the paving with a fall of 1 in 80. Use a 1 metre-long straightedge and shim of 12.5mm to do this. Dig a depth of 100mm along the edge of your patio and fill it in with concrete. Put the first section of channel on the concrete.


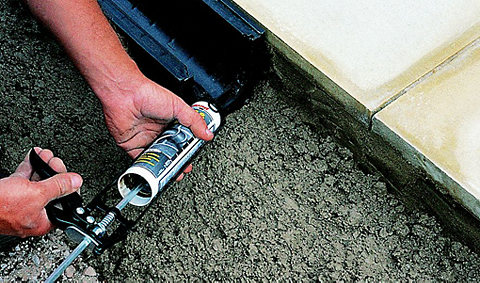
Step 2
Use waterproof sealant to fill the specially designed recess in the end of each section of channel. Then go on to fit the next section. Remember to keep checking the fall and repeat all the way along your required run. You could cut the channel with a panel saw if you need to.


Step 3
Build up the concrete on the outside of the channel, sloping away from it. Then fill the joint between the channel and the paving with dry mortar. Finally, fit metal grating over the top.
If you've spotted water building up at the edge of your patio and taking a long time to drain away, you can install an underground drainage pipe system to cure the problem. Other wet areas of the garden can be drained the same way.
However, there must be somewhere for the water to go. Rainwater should never flow into the main sewerage system. Instead, it should be diverted to a surface-water drain or, failing that, a soakaway in another part of the garden or even a river or lake (though in this case you'll need permission from the local authority).
Safety first
Check with your local authority how far a soakaway should be from a building, and which is their preferred method of construction.
When you're building an underground drainage system (apart from a perforated land drain), make sure you can rod the pipes if there's a blockage.
When you work in an excavation, you must make sure the soil doesn't collapse into the hole. If there's any danger of this happening, it's wise to shore up the sides with plywood boarding and stout timbers.


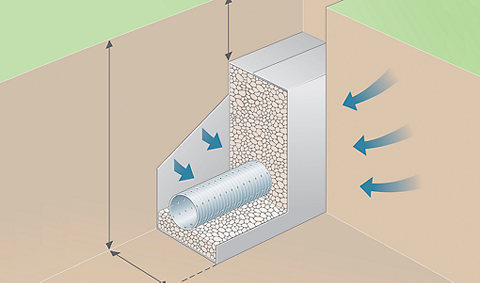
Step 1
Dig a trench about one metre deep and 350mm wide, with a fall towards the outlet (to a soakaway or surface water drain). Try to run your trench with the contour of the land, if you can.
Step 2
Line your trench with permeable geotextile fabric and lay 20-40mm of clean aggregate to a depth of 75mm in the bottom. The aggregate must be an even depth and follow the fall. Then lay a 100mm perforated plastic drainage pipe in the centre of the trench on top of the gravel bed.
Step 3
Work down the trench, filling it with aggregate to within 200mm-300mm of ground level, and taking care to keep the pipe central and running flat along the bed. Finally, lay geotextile fabric over the aggregate and cover it with top soil.
Soakaways disperse rainwater from drainage pipes, channels and land drains. But they mustn't be used for household drainage or sewage, and should never flow into the sewerage system.
You can buy a ready-made soakaway, which consists of open concrete blocks built up in rings. With a concrete base and a manhole cover on top, it's buried underground with permeable geotextile membrane wrapped around it to keep soil out. Any water that gets into the soakaway seeps out through the open blocks and membrane into the soil.
Top tip - Test your hole
Before you start excavating for a soakaway, dig a test hole at the required depth and check it doesn't fill up with water from the ground. If it doesn't, half-fill it with water and check that this drains away. If the water takes a long time to go, your soakaway may need to be bigger.


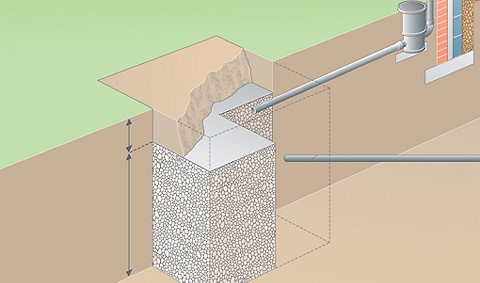
Step 1
A less expensive way of installing a soakaway is to dig a hole in the ground approximately 1.2m square and 1.2m deep. First, break up the clay or rock at the bottom of the hole with a fork or crowbar. Then cover the sides and bottom of the excavation with permeable geotextile fabric, overlapping it by 300mm where necessary.
Step 2
Fit a plastic underground drainage pipe from the drainage channel or rainwater pipe into your soakaway, and attach a gully trap at the top end of the pipe. Make sure your pipe slopes towards the soakaway. Then refill the hole with clean aggregate (40mm or larger), allowing for at least 300mm of top soil. Finally, cover the aggregate with more geotextile fabric and top up with soil.