
How to lay floor tiles
If you’re new to tiling, you may need a bit of help when it comes to tiling a floor. This guide will take you through the steps. Whether you’re laying tiles on wooden, cement or concrete floors, and whatever type of tile you’ve chosen. We want to help you complete your project, as well as ensuring that it’ll look great in your home for years to come.
- Knee pads
- Safety goggles
- Protective gloves
- Scraper
- Tape measure
- Pencil
- Calculator
- Chalk line
- Trowel
- Notched spreader
- Spirit level
- Damp cloth
- Bucket
- Flat bed tile cutter
- Electric wet tile cutter
- Tile nippers
- Tile file
- Grout float
- Dustpan and brush
- Grout finishing tool
- Tile sponge
- Dry cloth
- Floor tiles
- Floor tile adhesive
- Floor tile grout
- Polythene dust sheets
- Adhesive tape
- PVA adhesive
- Tile spacers
- Masking tape
- Flexible sealant
- Rubber mallet
When tiling your room, you’ll be starting from a central point and working your way out to each corner, one at a time. You’ll want to be able to exit the room without walking across your freshly laid tiles, so plan ahead and work into the further corners of the room first so that you finish by the door. If you’re tiling a room you’ll need to access regularly, such as a bathroom or kitchen, consider tiling one half of the room and then tiling the second half once this is dry. It’ll take a little longer but will allow the tiles to fix to the floor properly to give a hard-wearing surface.
Ceramic, porcelain and quarry tiles make really nice surfaces in kitchens, bathrooms, hallways and conservatories. They’re tough and hard-wearing, yet surprisingly easy to maintain.
You can fix tiles to concrete, wooden floorboards (provided you use an ultra-flexible adhesive) and even on existing floor tiles, but you must make sure the surface is in good condition and correctly prepared. It needs to be even, flat, dry and free from damp, and the correct adhesive must be used. If you’ve had other tiles or sheet flooring, you’ll need to remove any adhesive from the floor before beginning.
If the floor surface is dusty, prime it with diluted PVA adhesive and leave it to dry.
Before you start, make sure you follow the tile adhesive instructions on the back of pack as they may vary depending on the surface you’re laying the tiles on, and the materials of your tiles.
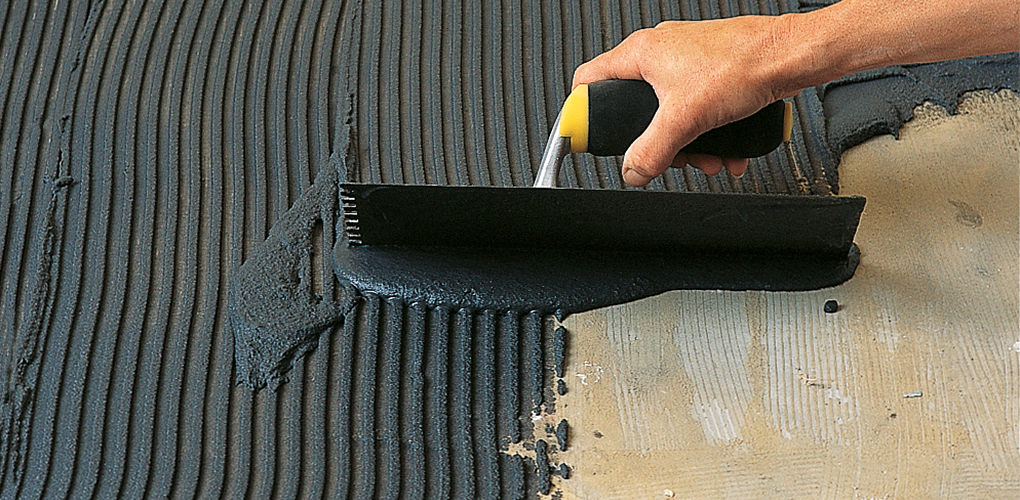

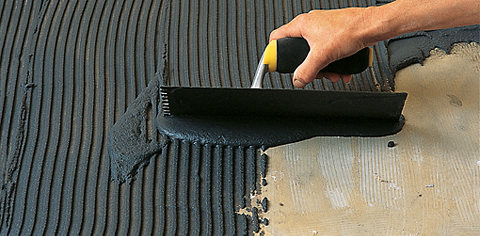
1. Spread tile adhesive across the floor
Starting at the position you’ve already marked out, use a gauging trowel to place tile adhesive on the floor, and use a notched trowel to spread this across an area of 1m². Use the smooth side to spread the tile adhesive on the floor, then draw the serrated edge back through the adhesive to form ridges. This will leave an even depth of adhesive to help create a level surface.

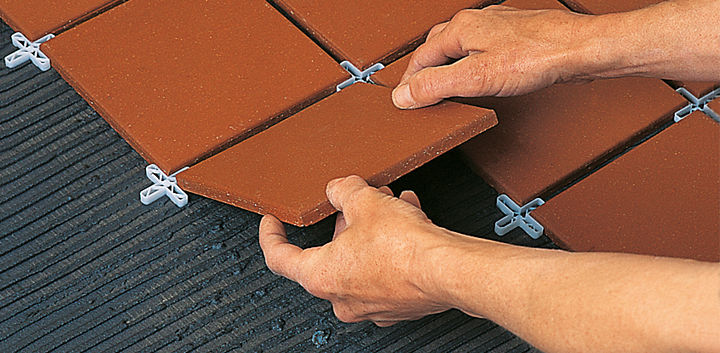

2. Fit the first tile
Place your first tile firmly into the adhesive, using a twisting action to bed it into the adhesive.
Repeat this process with the next tile and use tile spacers between each tile to ensure they’re evenly spaced. Be sure to press the spacers well below the surface of the tile so that they’ll be hidden once your floor is grouted.

3. Lay the rest of the tiles
Occasionally, check the tiles are flat with a spirit level. If they’re not, tap them lightly with a rubber mallet to level them. Remove any adhesive from the tile face with a damp cloth – it’s much harder to remove once it’s set.
Once all tiles are down, you’ll need to wait until the adhesive has set before you walk on them – this can take up to 48 hours. If you’re tiling a room which you’ll need access to, like a kitchen, bathroom or hallway, tile half the room one day, and the other half the next.
4. Cut tiles to fill in any gaps
To fill any gaps between the last whole tile and the wall, you’ll need to measure and cut some tiles. A good way to do this is to lay the tile that needs to be cut directly on top of the nearest whole tile to the wall. Then lay another tile on top, using this as a template. Position a couple of tile spacers flat against the wall and push the top tile right up to the wall. Use a tile marker to mark the tile beneath – make sure to account for space for grouting.
Floor tiles are heavier and tougher than wall tiles, so you’ll need a heavy-duty cutter to cut them. Wear goggles and gloves and use either a flat bed or electric tile cutter to cut along the marked line. If any rough edges are left after cutting, smooth these using a tile file.
Once you have the right-sized piece, position it in the gap to check whether you need to make any further adjustments. If it doesn’t quite fit, you can use tile nippers and a tile file for slight adjustments. When they fit perfectly, apply adhesive to the back of the tiles and fix them to the floor
Once the adhesive has set, you can begin grouting. It comes in different colours, but if you want to try something different, read through our ‘Design your tiles with shapes and different grout options’ article to see what you can create. Whatever you decide, you’ll need to make sure your grout is suitable for use with your tiles, and that you’ll have enough for your project. Check the packaging for coverage details.
1. Clean the area
Remove any dust or debris from the surface, and check that no tile spacers are sticking up.


2. Work grout into the joints
Use the gauging trowel to remove the grout from the tub and then work it into the joints using a grout float until the grout is level with the surface of the tile, covering the spacers.
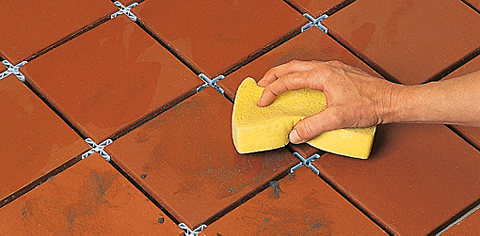
Once you’ve grouted several rows, smooth the joints using a grout finisher to compact the grout and leave a neat finish. Wipe any extra grout on the surface of the tiles using a damp sponge before it begins to set.
Continue to work your way across the floor, grouting, finishing and wiping away. Once finished, avoid walking on the floor and leave the grout to set. Check the manufacturer’s instructions for how long this will take, as different grouts will vary.
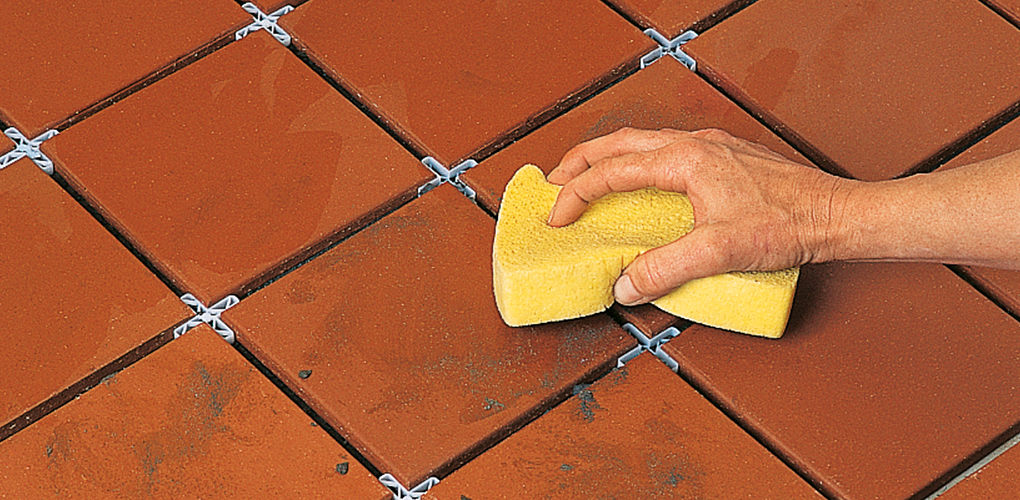
3. Clean the tiles
Once the grout is set, wipe the floor again with a damp cloth and then with a dry one to remove any remaining traces of grout from the surface of the tiles. If there are any stubborn areas, you can use a cleaning agent, but make sure the grout is fully dry before allowing any water contact.
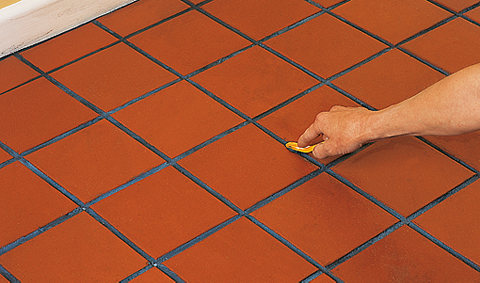
4. Seal the edges
Next, seal around the edges with a flexible sealant that matches the grout. This will help accommodate any movement or expansion between the wall and the floor. Lay masking table either side of the area you’re going to seal to avoid any mess. Work from one end of the skirting to the other and apply a continuous bead of sealant, keeping a steady pressure and speed. If you like, you can shape the sealant with a special tool for a different finish.
If possible, avoid using the floor for 24 hours after grouting and sealing.