A guide to Neva modular fencing
Getting started with your Neva fencing project
The brilliantly innovative combination of wood, composite and metal found with the Neva fence creates unique decorative designs. The convenient grooves and slats make it easy to assemble and give you the option to mix and match.
- Simple to plan with mix and match panels and posts for bespoke combinations
- Easy to assemble and dis-assemble due to the grooves and slats
- Quality materials, including reinforced composite, suitable for all weather conditions
For more information on the unique range of Neva fences as well as all the other fencing options we offer, read our buying guide to fence and railings.
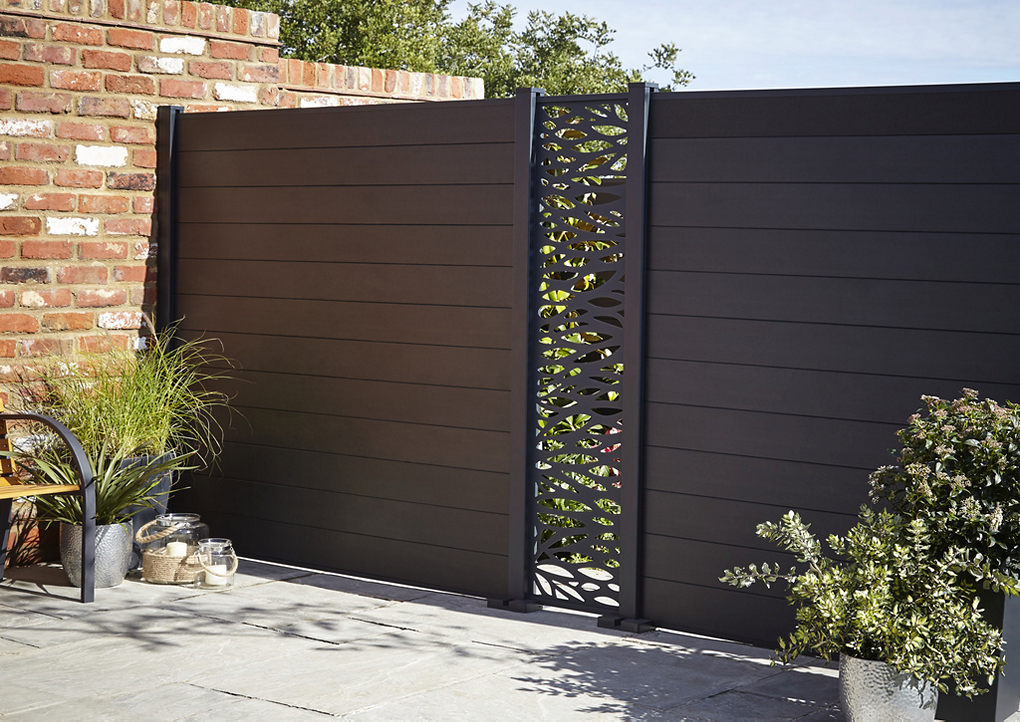
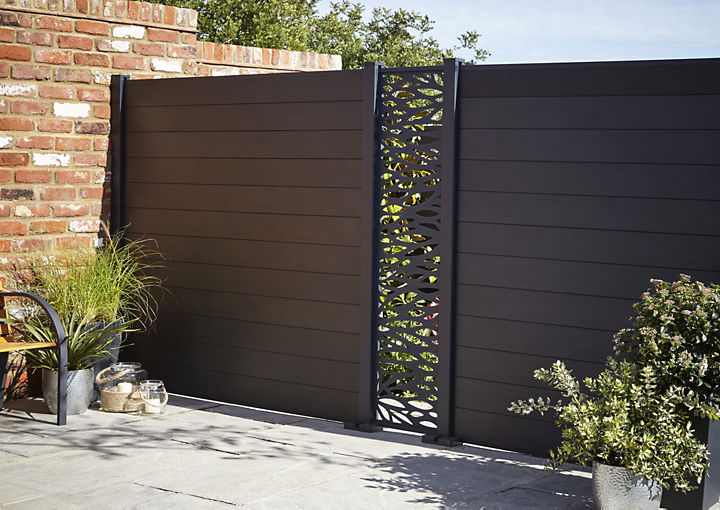

For this project, we’ll show you exactly what you need to do, from marking out the positions for the posts and fixing them onto an existing patio (a solid surface) or if you’re fencing over grass or soil (a soft surface) we’ll also show you how to set the posts into a ready-mixed post fix. We’ll go through the steps for inserting slats and panels and completing the project with post caps and LED lights that fit seamlessly into the posts.
Here’s the running order:
- How to install Neva posts onto a solid surface (concrete or paving)
- How to install Neva posts directly into concrete (for a soft surface)
- How to install a wall starting base
- How to install Neva composite and wooden slats
- How to cut composite or wooden slats to size
- How to install Neva panels
- How to fit post caps to Neva posts
- How to install Neva solar powered LED post lights
To help you understand what Neva products can be used where, here’s a simple product diagram to illustrate some of the options and where they can be used:
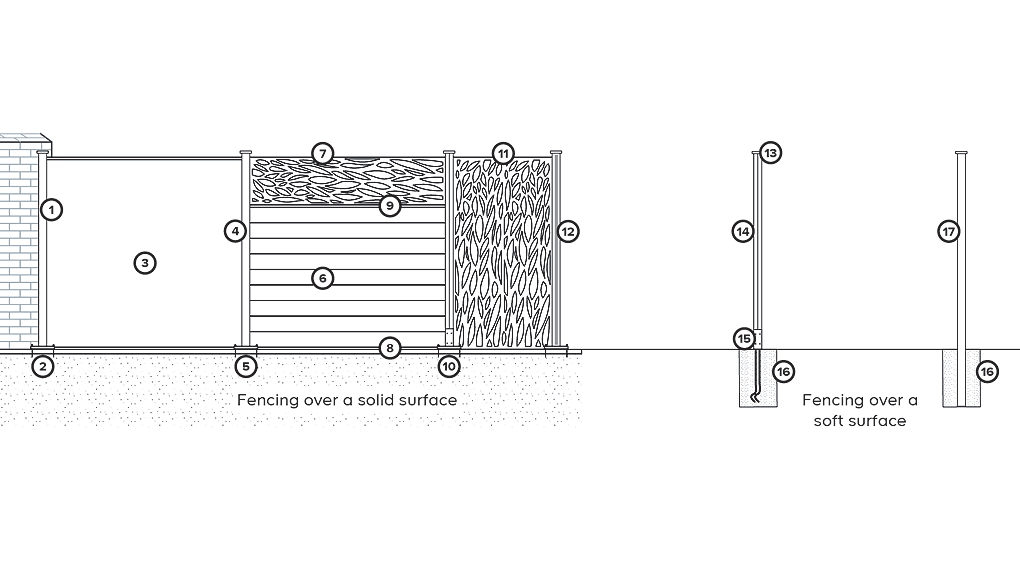
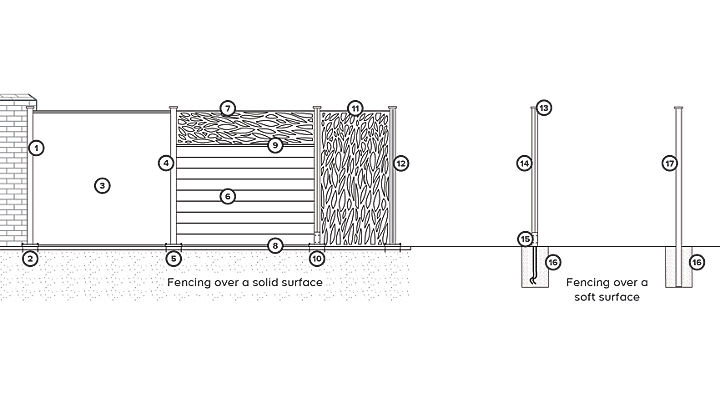
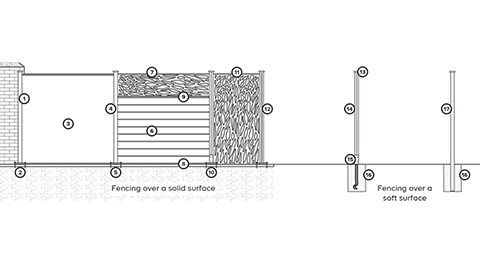
Key:
- Wall starting post (aluminium)
- Wall starting base (bolted down onto a solid surface)
- Full panel
- Post (aluminium, steel or wood)
- Bolt down post base kit (on a solid surface) for aluminium or steel posts
- Composite or wooden slats
- Quarter panel (fitted in the landscape position)
- Start profile (fitted to composite slats)
- Finishing profile (fitted to composite and wooden slats)
- Bolt down post base (on a solid surface) for wooden posts
- Half panel (fitted in the portrait position)
- Aluminium post fitted with LED solar powered strip light
- Post cap
- Wooden post (can only be used with the concrete-in post base)
- Concrete-in post base
- Concrete footings, made with post fix
- Post (aluminium, steel or wood) set directly into concrete
Selecting the right posts for the job
Before you start, it’s a good idea to understand the range of Neva posts available so you can select the right post for the job. The posts are available in aluminium, steel and wood (pine).
The profile of the posts varies by material. Aluminium profiles for example, allow you to change the direction of your fence with a middle recess to house the panels or slats.

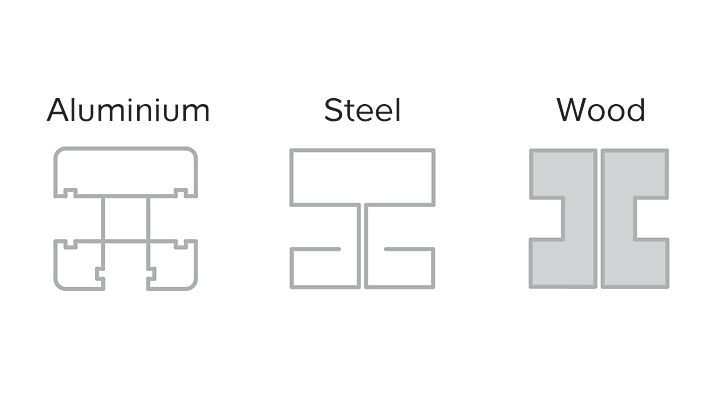
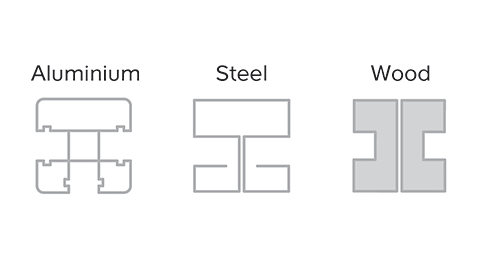
Aluminium posts give the option of a straight fencing run and can be used at a corner post to create an L-shaped fence. The profile has recesses (shown left, right and bottom) and a removable aluminium strip covers the slots that you don't use.
Steel and wooden posts only have recesses to the left and right, making these suitable for a straight run of fencing, and so cannot be used at a corner to create an L-shaped fence.
When buying wooden posts, you will need two half-posts to make up a complete post, two of these are installed back-to-back to make a complete post (as illustrated).
Please note that concrete posts are not designed for use with the Neva range of fencing and you should only use the recommended posts from the Neva range.
Neva posts: Aluminium, steel or wood
To help select the right posts for the job, here’s a quick reference table to compare the options:
| Aluminium posts | Steel posts | Wooden posts | |
|---|---|---|---|
| Strength | Strong | Very strong | Sturdy |
| Weight | Light | Heavy | Medium |
| For straight fencing runs? | Yes | Yes | Yes |
| Used at corners for L or U-shaped fences? | Yes | No | No |
| Used with wall starting base? | Yes | No | No |
| Used with all slats and panels? | Yes | Yes | Yes |
| Used with path and driveway gates? | No | Yes | No |
| Used with Neva LED post light? | Yes (240cm & 183cm posts only) | No | No |
What surfaces can the posts be used with?
| Aluminium posts | Steel posts | Wooden posts | |
|---|---|---|---|
| Fixed onto concrete or paving? | Yes (95, 139 & 183cm post kits) | Yes (95 & 183cm post kits) | Yes (183cm or 240 cm posts with Neva bolt down post base) |
| Fixed into grass or soil? | Yes (240cm post)* | Yes (240cm post)* | Yes |
*Shorter posts can also be concreted in with the base kit removed from the post
What post heights are available?
| Aluminium posts | Steel posts | Wooden posts | |
|---|---|---|---|
| 95cm | Yes (with base kit) | Yes (with base kit) | N/A |
| 139cm | Yes (with base kit) | N/A | N/A |
| 183cm | Yes (with base kit) | Yes (with base kit) | Yes (post only)** |
| 240cm | Yes (no base kit) | Yes (no base kit) | Yes (post only)** |
** Wooden posts can also be cut down to size, if required
Things to think about before you start
Before putting up a fence, it's important to make some necessary checks and considerations:
Neighbours and boundaries
We recommend that you: - discuss the plans with neighbours if the fence is next to their property. - check the exact line of the boundary as the existing fence might not have been built across the exact boundary lines as featured in the property's deeds. - confirm that the old fence is yours before you take it down. If it belongs to a neighbour, and they won't allow you to take it down, you can erect another alongside it as long as it’s on your side of the boundary.
Is planning permission needed?
Generally, planning permission is not required if a fence is not more than 2 metres in height anywhere on your property except where it adjoins a road or footpath. In this case, the height is restricted to 1 metre.
If you’re not sure, we recommend checking in with your Local Authority to find out if you do need planning permission. Find out more about planning permission at the government's Planning Portal advice website.
Preparation
Store your posts and panels flat in a dry and well-ventilated place until installation, for example on a garage or shed floor.
Clear the fence line of any plants or rocks, potting up any shrubs or plants that you will want to replant once the fence is up.
Help
Enlist the support of a helper for this project as an extra pair of hands will help with digging, leveling posts as well as carrying and assembling heavy materials.
Depending on how tall your fence will be and what materials you are using, a stepladder might be useful to help when fitting slats, inserting panels and installing the post caps.
Perfectly plumb posts
If a post is not set perfectly plumb or vertical, it will be unsteady and cause problems later on when the slats and panels are installed. With the right tools and a little bit of patient checking, it’s not difficult to achieve a plumb post. You can use a long spirit level down the length of the post and keep checking two adjacent sides of the post. Or use a special post level, which is strapped to the post and the three vials can be easily checked, hands free, whilst the post is adjusted and installed.